Recently I attempted to buy a carbon fibre rear hatch from Facebook marketplace, which proved to be a very frustrating experience. It seems some people don’t really want to sell things they list online.

After a few weeks chasing this seller, we finally agreed on a price and pickup location.  After a considerable drive, I sat in a nearby car park waiting for the communication that he was ready. He eventually told me that he couldn’t pick it up from his parents’ place because they were out visiting family. When I asked how long they would be, he waited another hour to tell me they were out for the day.

Fortunately, I had already left for home by then. I replied that if he wanted to sell it, he could drive it to me. Several hours later he finally replied that he just got home and it was “a bit late for all that running around”.

The idea was to replace the dodgy rear hatch with the carbon one to avoid paying to get it painted. Saving some weight would be a nice bonus. I guess I’ll be waiting a while longer.

I’ve just arrived home from a dyno run at Unigroup. The good news is the fuel gauge started working again after filling up some petrol on the way. I guess the float arm assembly was stuck and the new fuel dislodged it.

The bad news was that the dyno run was a waste of $100. I drove in with a measured high boost power of 206.5 rwkw, and left with 194.9 rwkw. Mark decided it wasn’t running right in the highest rpm range and told me it might make more power with less boost. He turned it down using the electronic boost controller, which killed the power, especially in the mid range. He upped it a bit to reach the ~195 previously mentioned, 11 rwkw down at peak and approximately 20 rwkw down in the mid range. He told me I had received more than $100 worth but he wasn’t going to charge me…

The first thing I did was turn the boost back up as soon as I left. I’ll back off the ignition timing a little at high rpm in the near future to put back in a little bit of safety margin.

The power curve looks like a typical engine with a smallish turbo and standard cams. I have no idea why Mark thought there was anything wrong, it was just running out of airflow up top. The driveability is so much better with a huge surge of power in the mid range so that’s the way it will be staying. The curve of the red line resembles the curve from the tuning at MRC so I don’t think anything is untoward.

20171004_112959.jpg

Long time, no post. Work has been crazy busy as always, and we are now parents. The Sileighty has slipped down the priorities list but has not been forgotten.

I had been taking it to work a once a fortnight or so. Recently on one such occasion, I went to leave and found the engine off instead of warmed up, and the car unable to start. I noticed I couldn’t hear the fuel pump priming, assumed I had a failed pump and order a new Walbro 450 l/h unit from EFI Solutions (TAARKS). I pulled everything apart and fitted it but the new pump would still not prime.

Days of head scratching followed as I tried to test all of the wiring through the car using the diagnostics from the service manual. All relays and fuses were ok. Finally, after connecting a direct 12V and ground to the fuel pump harness, the pump still wouldn’t activate. Therefore, there was a break in the wiring between the final harness and the connector.

20170924_094041.jpg

I ended up drilling out the little sealed plug in the cap of the tank, running some new wiring through before sealing the new wire with epoxy and silicone. This got the engine fired up immediately. Unfortunately, the wiring for the fuel level has been damaged in the process and will  need attention at a later date.

20170930_170601.jpg

The new coil packs came two days earlier than projected. I plugged in one of the new ones (the other is a spare) and fired up Nistune to lower the dwell times from a previous target of 2.9 ms to a new target of 2.4 ms. I drove the car a short while and it seems to spark strongly so this new setting will be staying.

dwell-changes-fixed

Yesterday I picked up a bargain set of adjustable rear camber arms from the Facebook marketplace for $70. I’m not sure of the brand but they are robust and rose jointed on one end. I’m aiming to remove a bit of negative camber from the rear to aid with traction. The car has plenty of power for drift, the extra grip will likely help with control (and tyre wear).

20170425_105128


It’s well after hours and I did not receive a call as promised from Springwood Car Care. Pretty typical of the average workshop; zero commitment to customer service. If they’re too busy, no problem, just keep me informed. Don’t think I’ll bother with them in future, which is a shame since they are less than 10 minutes from home.

Unfortunately I have had a coil pack failure so it’s unlikely that I can run on the dyno today. I’ll still wait for them to call me for me to pop in as originally planned to see how good their customer service is. There is an odd chance they’ll have a Yars in the carpark to borrow a coil pack from.

At the drags last week I noticed an electrical burning smell after one of the runs. The car was fine for the trip home, but the other night I went to top up the petrol ready for the dyno and it dropped to three cylinders. Yesterday I was able to identify the culprit as a coil pack when I could move the problem between cylinders by moving the coil pack. This shows that the wiring is sound and the spark plugs too.

The good thing about Yaris coils is that they are a lot cheaper and easy to get than those for the SR20DET. The going rate on eBay for brand new factory items is about $50. I have two on the way which should arrive by the end of the week.

The only thing I can think of that would have made the new coil pack fail is too long a dwell time. I will tweak in Nistune and update the ignition upgrade page. The time slips from the most recent drag racing have been scanned and added to the results page.

Been away for a few days attending a funeral and then on holidays. I’ve arrived home to find some new neo-chrome wheel nuts waiting for me from GKTech. The quality seems excellent and for my car the required thread pitch was 1.25 mm. My car already had long wheels studs but the existing nuts were tiny and didn’t grab as much as possible.

During the ‘install’, I took off the wheels, cleaned the threads of the studs and then used some grease to reinstall. There is no longer any stud thread exposed so the grease is contained and shouldn’t attract dirt. For $28 I think they look pretty good, plus the added strength is a bonus.

The car is meant to be going on the dyno again on Monday. This time it’s at a local dyno, 5 minutes away. It’s a hub dyno which is new to me. We’ll see where the power is sitting after the fixed misfire and increased boost. It will be hard to compare on a new dyno but it should be interesting nonetheless.

The roll cage is now in. I planned to buy some foam to cover the roll hoops today but I realised that’s hard to do on Good Friday.

Supercheap Auto was open and I was able to get a pair of longer M10 bolts and nuts. This allowed me to put them through and do them up tight, pulling the cage mount and the plate under the car closer together. They can then be removed and the shorter 30 mm bolts put in place. The worst part of the job is the silicone that coats your fingers and tools as you play with the nuts and bolts.

Once I can get some foam I’ll cable tie it to the roll hoops to finish everything off 100%. Big shout to my wife for assisting yesterday. She held a spanner on the tops of the bolts while I tightened the nuts in the wheel wells.

Last night was very frustrating. Long story short: gearbox issues are only worsening and three of the four runs were wasted by shifting from 2nd into 5th instead of 3rd. The night was extremely quiet at first. I had two runs within the first fifteen minutes, but then it started to sprinkle. The rain was so light that the road wasn’t even wet to touch, yet it closed the track for over an hour. Strangely, more competitors poured in during this time. When the track eventually reopened, I managed another two runs.

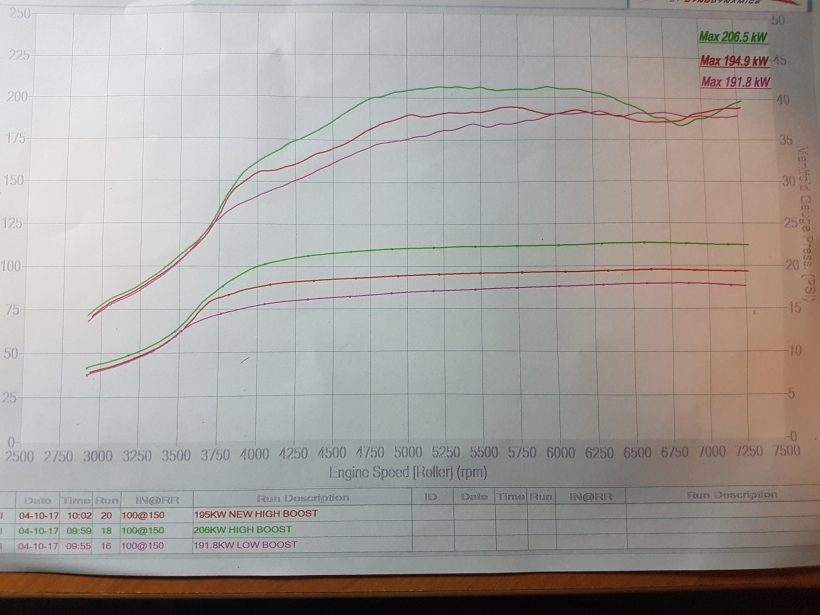
The good news is I managed a PB on the first run, despite the engine not quite being up to temp. 12.686 @ 114.88 mph was a nice improvement over the 12.844 @ 114.31 mph last time out, but there is no doubt the car is capable of more. The wider (albeit cheaper) rear tyres at 14 psi were good to launch, with 2.0xx second 60 ft times on each run. Next time I’ll try even lower pressures, as there was still wheel spin shifting into second. I will scan and post the time slips at a later date.

I could probably drive around the gearbox issues but I’ve never had these type of problems shifting in any of my other S13s. This morning I purchased some gearbox oil and friction modifier in the hope it will improve things a lot.

20170413_141255

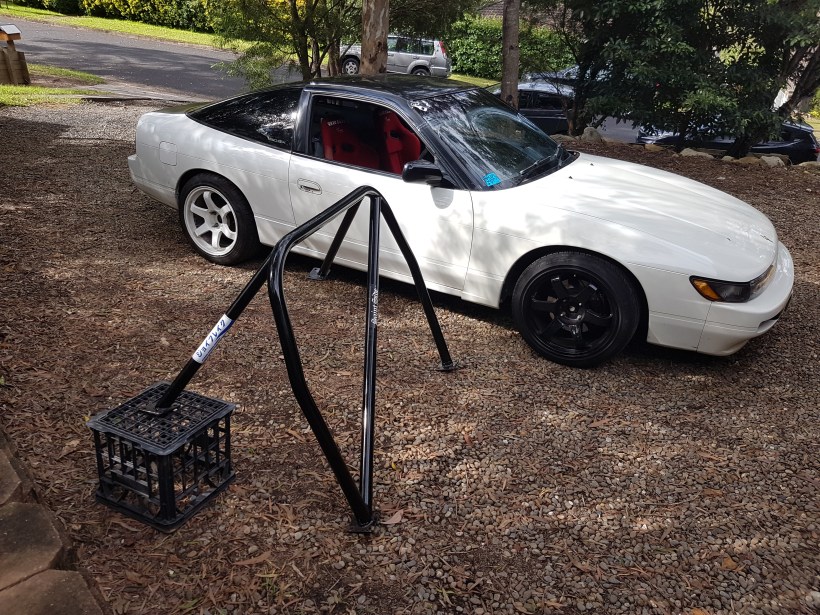
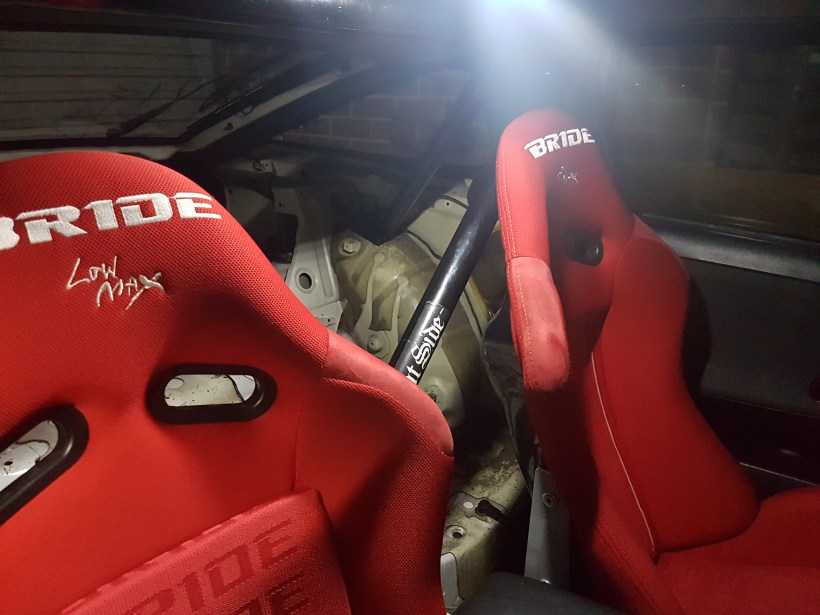
This afternoon I commenced on the roll cage installation. It seems pretty well made, with decent welds and weighing in at 18 kg. It is all one piece so I was hoping to insert it through the rear hatch, but it just won’t fit. The seats have to come out and then it goes in fairly comfortably through the passenger door.

20170413_143719

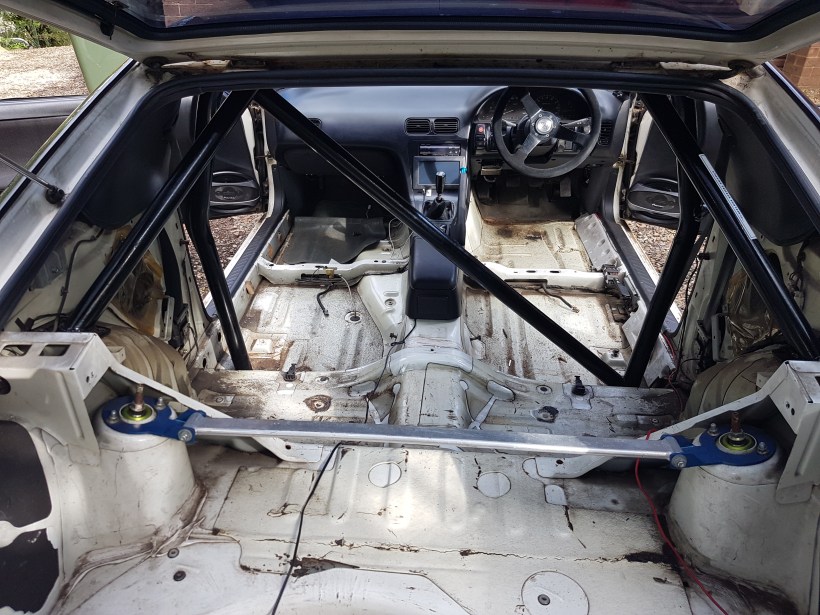
Now the real work can begin. I used a 12 mm step drill to initially drill a single hole for each mount. This would let me put a single bolt through to keep alignment. I’d like to note that I spent $20-30 on new high tensile nuts, bolts, washers and spring washers. The old ones were toast but even if they look OK, you might as well spend a bit extra for the safety.

Some of the bolt holes are hard to get to when you drill the remaining. For these I used a flexible extension on the end of the drill. The picture below right shows the holes from underneath.

Next I cracked out the silicone sealer and coated the underside of the new holes. The plate was then put in place and a single bolt and nut inserted. Tightening this pulls the inner and outer plate closer together and makes the other bolts easier to connect. I used a spring washer and washer underneath the car to prevent them working loose.

Currently the bolts are in place for the two mounts inside the wheel well. The holes are drilled and ready for the two floor mounts. I will hopefully silicone and insert nuts and bolts to finish the install tomorrow. M10 x 30 mm bolts were perfect for the wheel well mounts, although I think I will need slightly longer bolts to reach for the underside mounts.

I’ve driven the car the last two days and i’m happy to report there are no leaks. I didn’t end up installing the half cage yesterday, instead I cleaned the inside of the car thoroughly. The S15 seats were blocking the garage and therefore the car had been sitting outside in the heavy rain for the last month. The result was a healthy amount of mould forming on much of the interior. The insides of the windows were also still filthy from the last drift meet. I tend to drift with the windows open and the residue left behind from the splashing water is filthy.

Everything is packed ready for drag racing tonight. The temperature is cool which is ideal for horsepower. There is some spitting rain around but the weather report seems pretty good for tonight. Fingers crossed it stays dry and I can launch the car and shift gears smoothly.

Last time out was a 12.8 @ 114 mph. The misfire is fixed and the boost is slightly increased. Top end power is noticeably better. Furthermore, I have a cordless air compressor with me so I can confidently lower the rear tyre pressure for racing before restoring it before the drive home. I also have the wider rear tyres on that came with the white wheels. More power and more grip should mean noticeably improved performance. My aim is for a 12.5 ET, which is very doable if I can launch the car properly. The trap speed should improve a few mph as well, regardless of my (in)ability to get off the line cleanly.